|
Description/Features
|
| Durable vinyl decal, suitable for outdoor use. |
| Available in matte vinyl |
| Adheres to any smooth non-porous surface such as glass, metal, cardboard, plastic |
| Proudly show your support for law enforcement |
| Product Dimensions |
|
Product Sizes: (H x W) 5"
Decals are measured at the highest or widest point.
DISCLAIMER: Decals are sized differently because they are measured to precise proportions. You will not be able to build a complete map of the United States by combining these decals.
|
How to Apply Vinyl Decals
Decals are a great way to add a unique touch to many spaces and surfaces. Whether you plan to display your new decal on your car, laptop, living-room wall, or anywhere else, proper installation is crucial for creating a strong bond that lasts long and looks great. That's why we've put together this guide that teaches you how to apply decals in just six easy steps.
Step 1:
Tools Needed
| Scissors |
Paper Towels |
| Masking Tape |
Tape Measure |
| Plastic Applicator Squeegee or Credit Card |
Warm Water or Other Common Household Cleaning Item |
Step 2:
Clean the Surface
The first order of business before you apply your decal is to make sure the surface is clean and dry. Any dirt, debris, or moisture can weaken the adhesion. Use warm water and soap, rubbing alcohol, or other common household items for a good clean. Be sure to wipe away any left-over cleaning product or residue with a dry cloth before moving on to the next step.
Step 3:
Tape & Measure
Before you peel away the backing, tape your decal down on the surface where you intend to apply it. Measure and adjust to make sure it is centered and straight.
Step 4:
Remove the Transfer Film from the Backing
Run a long piece of tape across the top of the decal to form a hinge. Slowly peel away the transfer film from the white backing.
With smaller decals, you can peel away the entire backing. For larger decals, it may be best to peel away the first portion and apply the decal to the surface as you peel away the rest of the backing.
Step 5:
Apply the Decal to the Surface
While holding the bottom end of the decal away from the surface. At the top of the decal, apply pressure with a plastic applicator squeegee or credit card. Start from the center of the decal and, with a scraping-like motion, work your way outward left to right, working your way down the decal.
Step 6:
Remove the Transfer Film
Once you've placed the decal, slowly remove the transfer film and press down any loose pieces and work out any air bubbles
Step 7:
Enjoy!
Now you can remove the transfer film and enjoy your freshly placed decal.
Production Time Table
3 Business Day Standard:
This is our most popular fast turnaround option. Free and speedy enough for almost any custom order.
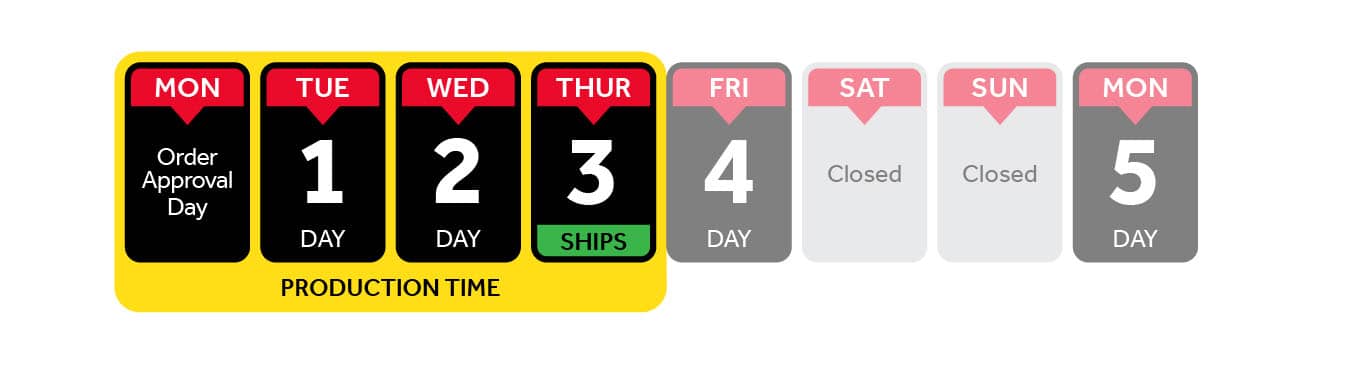
- Orders approved after 5:00 PM CST will be processed the following business day,
- Emergency/same day rushes are available in some cases, Please speak with a customer service representative today for more information,
- Note: The time it will take to receive your product includes the production time as well as the shipping time.
- Turnaround starts from the time the file upload is complete. If an order is flagged in our prepress department or a proof is requested awaiting approval, turnaround starts from the time the approval is given.