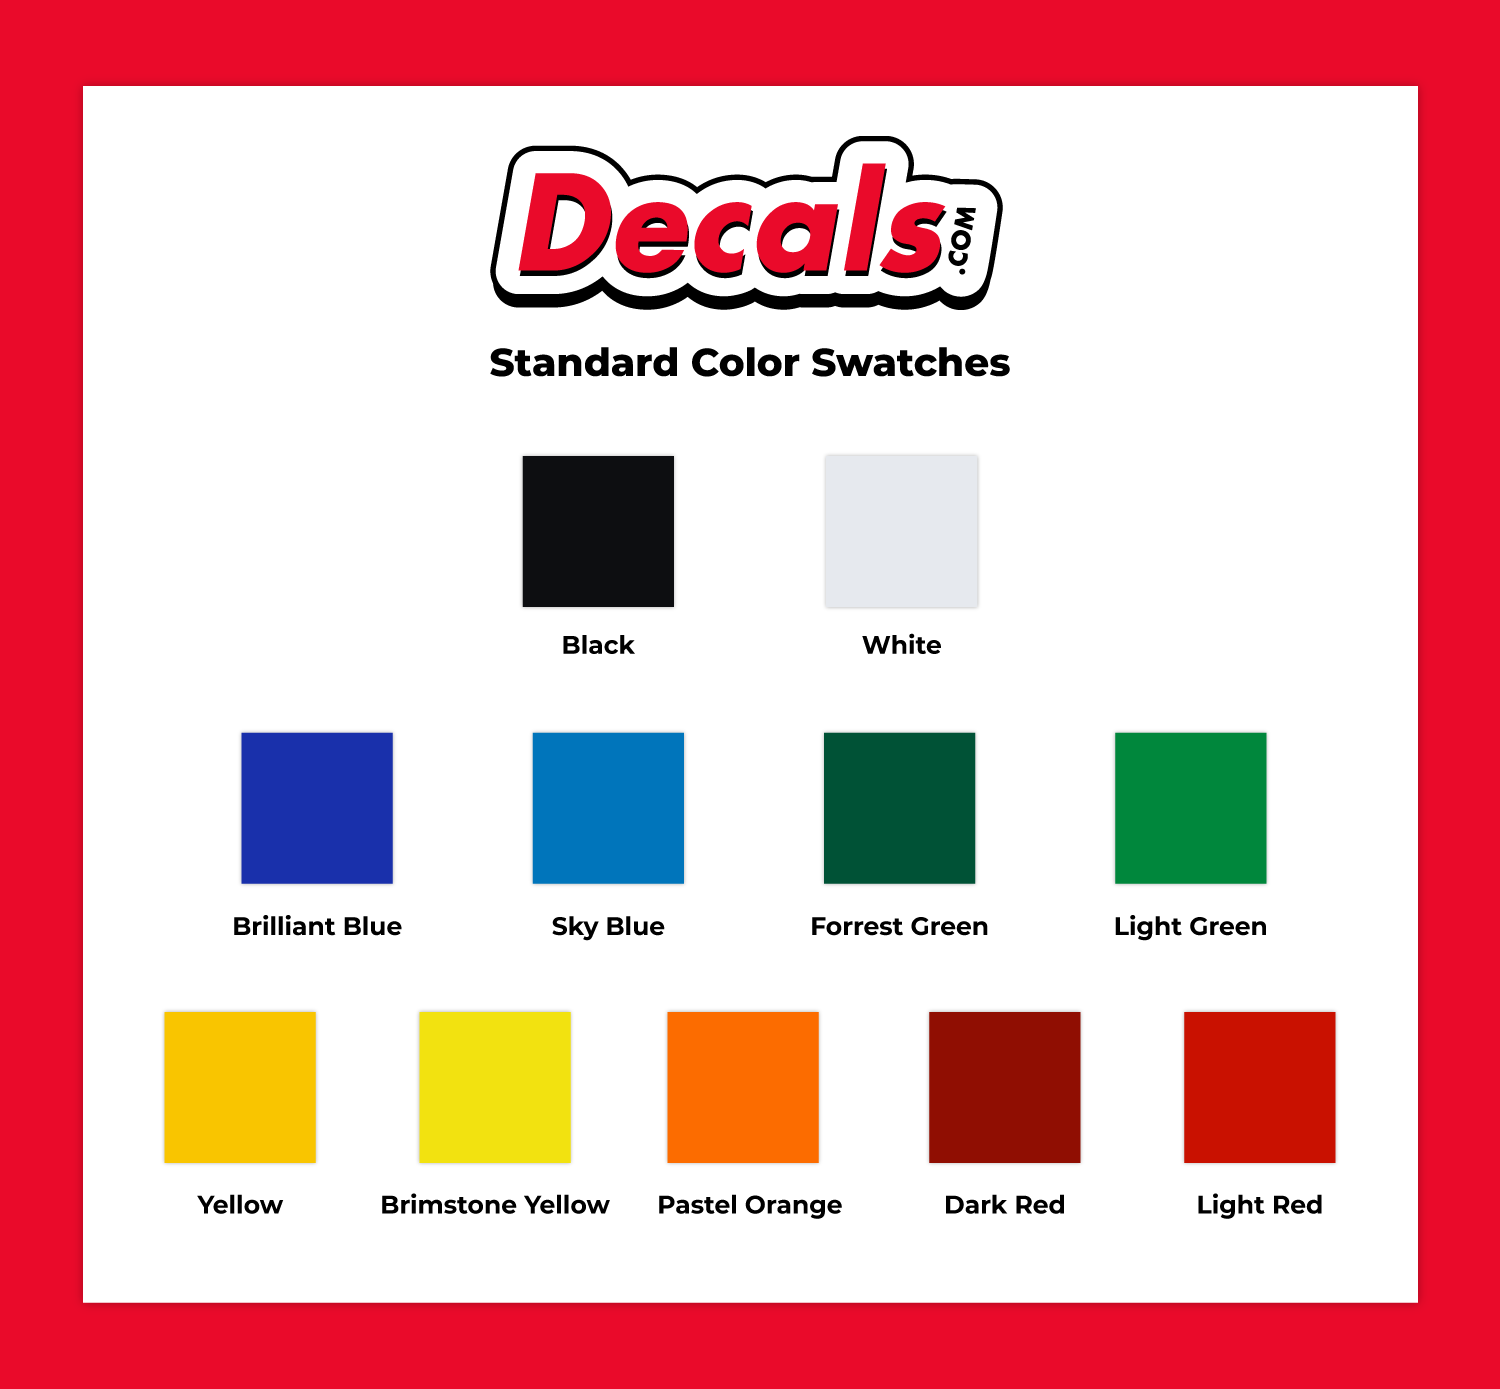
Custom Vinyl Lettering Color Options
We offer 11 different standard color options for your vinyl lettering, as follows: Black, White, Dark Red, Light Red, Brilliant Blue, Sky Blue, Forest Green, Light Green, Yellow, Brimstone Yellow, Pastel Orange. Please refer to our chart below for specifications on each color option.
Design Methods
Design from Scratch
With our easy to use online designer, you can quickly design your custom vinyl lettering & numbers. Just upload an image or logo from your computer or choose from our wide selection of clipart to create your personalized vinyl lettering & numbers.
Upload a File
If you decide to upload an original file, instead of designing your own, you will need to upload an .eps file. This ensures that you will receive the highest quality vinyl lettering & numbers possible! Once you have added your product to your cart and select your shipping method, a proof will be emailed to you. When you approve your proof and make a payment, your order will be complete.
Payment
All orders must be paid up front prior to being put into production. We accept VISA, Mastercard, American Express, and Discover credit cards. We also accept checks, which must be received prior to your vinyl lettering & numbers being put into production.
Live Order Tracking
Back in the early days of making decals, we built a system called Live Order Tracking that enables our customers to track their order through every stage of our streamlined process, from order placement to delivery.
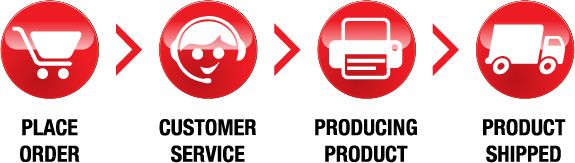
After placing your order for vinyl lettering & numbers, you’ll receive a unique Live Order Tracking number via email that will allow you to track your vinyl lettering & numbers every step of the way. Need the current status of your order? Just click the link in the email and get the most recent updates from our dynamic Live Order Tracking system.
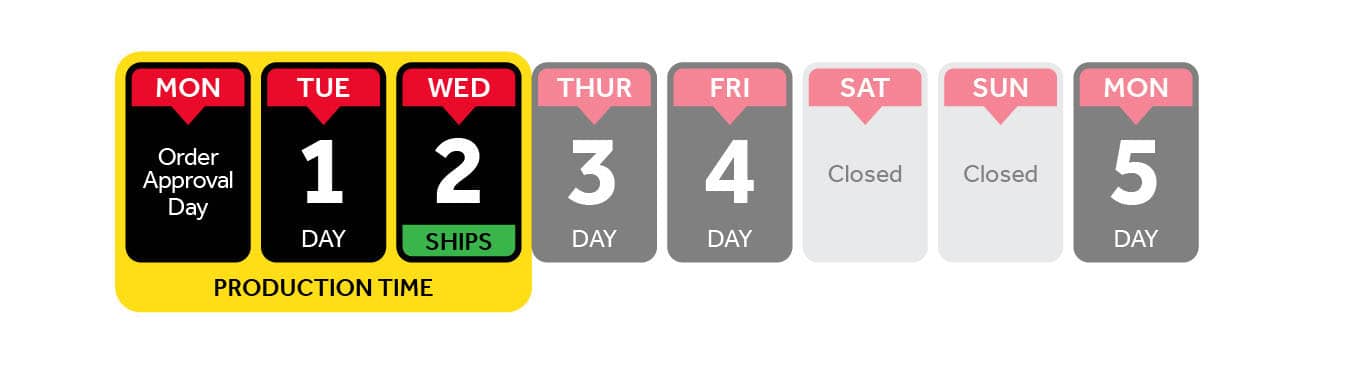
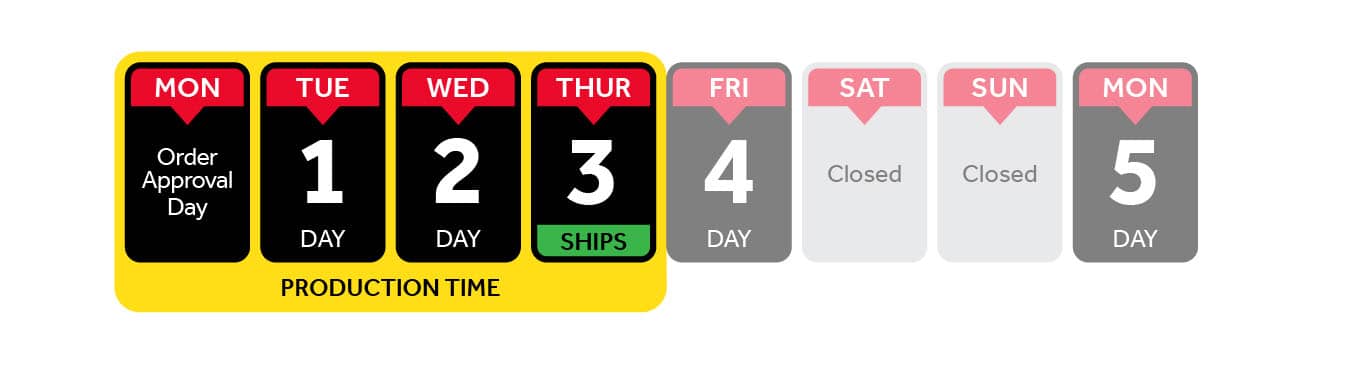
Production Time Tables
Our flexible production times range from one to five business days. This allows you to make the final decision on when you need your order.
2 Business Days Express:
Need your products quickly? The express option is ideal for you!
- Orders approved after 5:00 PM CST will be processed the following business day,
- Emergency/same day rushes are available in some cases, Please speak with a customer service representative today for more information,
- Note: The time it will take to receive your product includes the production time as well as the shipping time.
- Turnaround starts from the time the file upload is complete. If an order is flagged in our prepress department or a proof is requested awaiting approval, turnaround starts from the time the approval is given.
3 Business Days Standard:
This is our most popular fast turnaround option. Free and speedy enough for almost any custom order.
- Orders approved after 5:00 PM CST will be processed the following business day,
- Emergency/same day rushes are available in some cases, Please speak with a customer service representative today for more information,
- Note: The time it will take to receive your product includes the production time as well as the shipping time.
- Turnaround starts from the time the file upload is complete. If an order is flagged in our prepress department or a proof is requested awaiting approval, turnaround starts from the time the approval is given.
5 Business Days Saver:
If you’re not in a rush, then you can save some money by choosing our 5 Day Saver option.
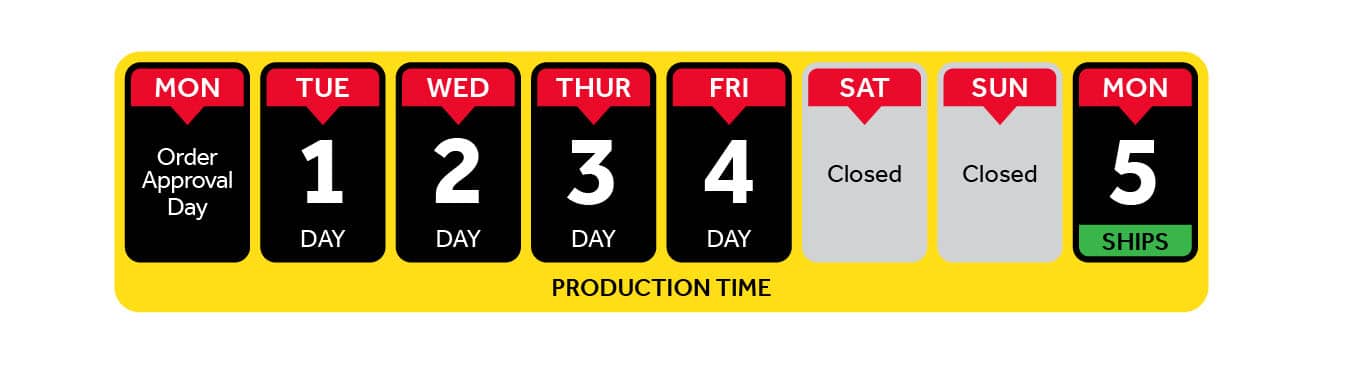
- Orders approved after 5:00 PM CST will be processed the following business day,
- Emergency/same day rushes are available in some cases, Please speak with a customer service representative today for more information,
- Note: The time it will take to receive your product includes the production time as well as the shipping time.
- Turnaround starts from the time the file upload is complete. If an order is flagged in our prepress department or a proof is requested awaiting approval, turnaround starts from the time the approval is given.
Transfer Cut Option
Transfer-Cut
Transfer cut option means that we will be cutting the vinyl decal material to a specified shape, graphic or text and then removing or “picking” any excess or unwanted vinyl material from your design leaving no vinyl background on your decal. We then place a transfer tape over the top of the remaining pieces of vinyl. This tape is what holds all the individual cut pieces of your decal design once you remove the paper backing from your decal. It also allows you to place multiple individual pieces of vinyl decal material on your desired surface cleanly and evenly.
* Vector File (EPS or Ai – Adobe Illustrator) format needed for Transfer Cut decals. *
Transfer Cut / Pick Charge
Transfer cut price includes 8 standard picks with a Maximum of 40 picks per sq. foot.
Additional picks are $0.02 to $0.04 per pick depending on difficulty/intricacy.
Intricately cut decals will be custom quoted based on difficulty and time required to pick.
For more information visit our transfer cut guidelines.
Custom Vinyl Lettering Artwork Specifications
Preferred Files for Printing
The maximum file size we accept is 100 MB. Our preferred file types are:
- Adobe Illustrator EPS (Encapsulated Post Script)
- PDF (Adobe PDF)
When submitting these files, make sure you convert all fonts to outlines or curves to ensure they print correctly and the fonts are not substituted.
Additional Files Accepted
- JPG (High Resolution JPEG)
- TIFF (High Resolution TIFF)
- PNG (High Resolution PNG)
File Tips
- Set up size proportionate to the exact size product you are ordering
- Convert all text to outlines
- Only Allow for bleed if necessary
- Never flatten/merge layers in a PSD file
- Indicate the cut line clearly for all decal products
Transfer Cutting refers to any sticker or decal that will be picked or weeded with transfer tape applied over the top of it. Most commonly used for vinyl lettering.
- Simple and open fonts are recommended.
- All text must be at least 1/2" tall.
- The space between characters and other design elements must be at least 1/8”.
- Main strokes, line weights, or art elements should be a minimum of 1/8”
- Minimum pick size of 1/8”.
- We recommend you request a proof for this product.
Disclaimers:
- Transfer cut price includes 8 standard picks with a Maximum of 40 picks per sq. foot.
- Additional picks are $0.02 to $0.04 per pick depending on difficulty/intricacy.
- Intricately cut decals will be custom quoted based on difficulty and time required to pick.
Vector Art
Vector art consists of lines and curves that are mathematically defined objects. When viewing art in key line mode you can see the points or vectors when connecting your lines and curves. They can also be seen when using the pen tool or editing the points along a path. Vector art is ideal for type and drawn shapes because they can be enlarged to any size while maintaining crisp outlines and details without sacrificing quality. The distance between the vectors is calculated mathematically and is not dependent upon resolution.
Raster Art
Raster images consist of colored squares, called pixels. They are created by combining a series of various colored pixels. Digital photographs are made up of pixels. If you view a raster image at 200% or more you are able to see the individual pixels that make up the image. Raster images are dependent upon resolution so image enlargement is limited by the individual size at which the file was created. If a file is produced at a size that is larger than its resolution will allow, the quality will decrease. Printing a low resolution file will result in pixelation. Individual pixels are large enough to be easily discernable. Increasing the resolution will not solve this problem is there are not enough pixels to begin with. The program will add more pixels based upon the estimation of their location and will then assign their neighboring pixels's color value. This may cause an image to look muddy.
If submitting these files, please follow the guidelines below:
- 100% scale (full size output) at 100 dpi
- 50% scale at 200 dpi or higher
- 25% scale at 300 dpi or higher
- 10% scale at 600-1200 dpi recommended
Design Services
If you are not able to provide us with a good quality image, we do have a vectorizing/recreating service available. Most logos or images can be recreated for as little as $15; however images with more detail are subject to quoting prior to vectorizing the image. Please contact a sales representative for more details.
This service needs to be paid for in advance of us printing your order. We will keep your recreated vector artwork on file for you to use on all future orders.
Releasing the recreated vector artwork to you for personal use can be done for an additional cost.
Shipping
- You can expect your Decals.com order to arrive within 2 - 4 business days (after production time) to 90% of the United States.
- Unless otherwise specified, at the time of ordering, your custom vinyl lettering will ship via UPS Ground.
- If you have any questions about shipping rates or rush production, please contact our friendly Customer Service Representatives at (320) 391-5250 prior to ordering.
- You will receive a tracking number once your package has shipped.
- To read more about our shipping information visit our shipping policy page.
Shipping Methods:
- Economy (5-15 Days)
- Standard (3-5 Business Days)
- Three Day (3 Business Days)
- Two Day (2 Business Days)
- Overnight (1 Business Day)
Important Economy Shipping Notes:
- If choosing economy shipping, please include additional postal information such as your P.O. Box in the "Address Two" field on the checkout page to help ensure delivery.
- Using economy shipping can also add an additional 5 - 10 days, depending on where the package is being shipped to.
National and International Shipping Notes:
- Decals.com ships throughout the United States and Internationally.
- All international shipments must have shipping labels as well as customs documentation provided by the customers. We will only accept international shipping labels from the following carriers, USPS and UPS.
- Contact a Customer Service Representative at (320) 391-5250 for more information.
How to Apply Vinyl Decals
Decals are a great way to add a unique touch to many spaces and surfaces. Whether you plan to display your new decal on your car, laptop, living-room wall, or anywhere else, proper installation is crucial for creating a strong bond that lasts long and looks great. That's why we've put together this guide that teaches you how to apply decals in just six easy steps.